Tag: yoga poses

Forward Folds and Bending Over Backwards in Nature

The number one thing that adults say when I tell them that I am a yoga teacher is:

“Oh, I can’t do yoga!  I’m so inflexible and I can’t even get close to touching my toes.”

For about twenty-years now, I have tried every socially acceptable way possible at these moments to try to explain that yoga isn’t about being flexible, that anyone and everyone can benefit, that one may or may not become more flexible through yoga, that flexibility is, truly….besides the point entirely.  As soon as I start talking, I see the recipient’s eyes glaze over.  They are no longer paying attention to me, mostly because they only asked what I did for a living as a social pleasantry in the first place. Now, they are filled with regret for having ever made eye contact in the first place.  I can almost see the thoughts of escape to the cheese platter or, even better, the bar, cross their mind.

A couple weeks ago I was on a walk with a friend when t he concept of “tensegrity” came up in conversation.  (As an aside, you know you have a pretty wonderful friend when “tensegrity” just pops up in casual conversation.) It made me think about the relationship between tension and flexibility.  Every once in a while I will have a naturally flexible student.  Believe it or not, it is the most flexible students who struggle the most in yoga poses.  The lack of tension or pull to push against makes them feel floppy and un-centered.  It’s hard to focus when there is a lack of effort.  These students need to learn to engage muscles in a different way in order to feel into the shape of the pose and create sensation, effort, and release.  For the least flexible student, the evolution of a posture, simply by holding, exploring, and breathing, appears profound.

When I organize a yoga class plan, or a practice for myself, I try to make sure that, during the practice, we take our spines in all the directions it can go in: forward-back, forward fold, backbend, side bends, and twists.  It feels really beautiful to release tension around the spine and to unwind the habitual movements of the day through the practice of asana.  So many of us start to get stuck through our daily lives as we hunch over desks, lean into the back seats of cars to insert children (sometimes not willingly) into their car seats, and fail to remain curious and open to all the movements that are possible, even when they aren’t probable. If you watch a 6-month old baby, just put them down on the floor in front of you and see, for even five-minutes, you will see that they practice about five to ten recognizable asana during that time.  Yoga poses (asana) are natural for the human body.  These shapes and movements reflect our inherent desire to take ourselves in all the directions we can move in.  We can slither, slide, press, release, squease, lift, drop, shimmy, shake, hum, reach, collapse…….there are infinite movements available to us.  Just watch a video of Michael Jackson dancing and you will realize that it is likely you are only using about 20% or so of your human body capacity for movement.  Yoga asana are the natural movements and shapes of the human body.  Me, hunched over a desk all day?  There is absolutely nothing natural about that.

10-28-16-fall-continues-032
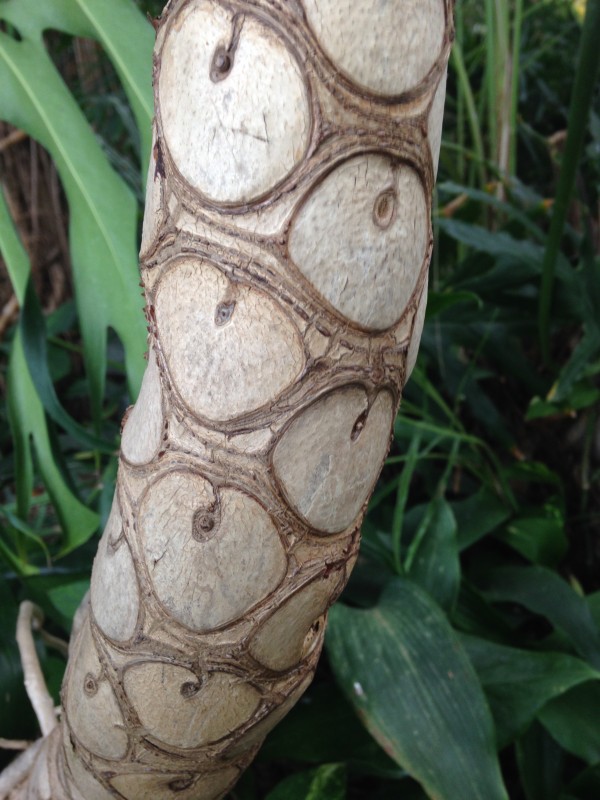
In nature, there are many examples of trees and plants that bend.  Most obvious, of course, is heliotropism–movement towards the light.  But, if we look closely, we see that the cellular structures of plants and trees organize in circles, spirals, twists and forward folds and back bends in response to tension, gravity, and other forces.  Take, for example, the pattern on the trunk of this tree.  This intricate mapping of circles, swirls, and criss-crossings, is only possible because of the tension inherent in those spaces.  The inside of each enclosure maintains the integrity of the inside, while, at the same time, defining the space that is outside.

bikram-back-bend
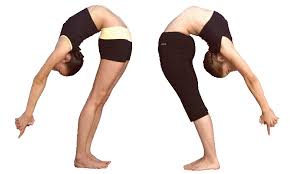
Any potter or architect will tell you that space is an important element of design.  Space is not synonymous with empty.  When you pick up a bowl, the space inside the curve represents the potential for holding.  It may, at that moment, be empty, but there is still space there.  Let’s say we fill that bowl with peppermint candies.  The space is filled with the candies, but it is still space.  When we practice yoga asana with this perspective in mind, we can get curious about the space that exists in our bodies and how to create more space.  What are the spaces that are empty?  Where are the crowded spaces?  What can be moved or re-distributed?  What are the solids providing something to push against?  Where are the natural bends and folds?  Look at the women in extreme back-bending postures.  These are extreme examples being used here not to suggest that your back-bend should look like this, but because these images invite us to examine the space around the body more easily.  Where is the space?  The space is actually beneath the spine.  While many of us refer to back bends as “heart-openers”, the anatomic reality of these shapes are that our hearts are pressed up into the chest cavity with the spine rising up to meet it.  The space underneath the spine is expanded and opened.

forward-fold
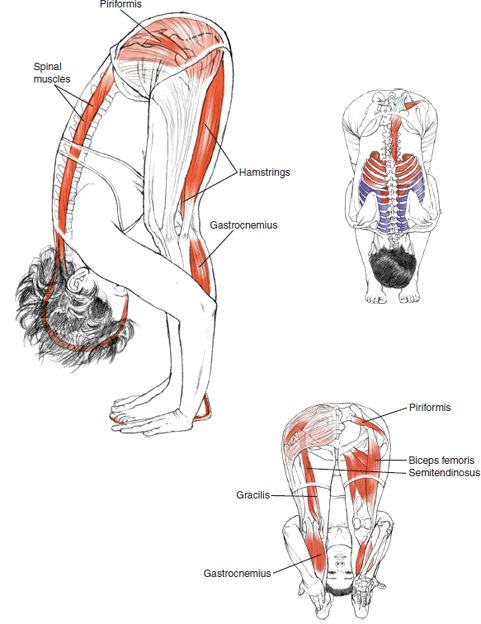
In a forward fold, the space for the heart expands and the spine rises above as it pulls back and away from the heart.  To give the heart the most room, we allow the spine to round, creating the space at the heart center.  We can breathe there, into the space, and feel the opening from the heart to our legs, and even further into the earth.  Experiment with this space you create in front of and behind the spine. Where does the space go when you release the yoga pose?  Actually, it is always there, but your shifting the contents of the space allows you to play with what is the container and what is contained.

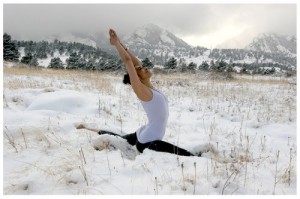
I invite you to not only think about the shape that your fold or bend takes you in, but how the space around you shifts.  Explore these images of bends and folds in nature, not just the way that the shapes appear, but how the shape both creates and consumes space.  Whenever I guide students through savasana, the final relaxation at the close of most yoga classes, I always suggest that students release any tension that they might be holding in the space directly around their body.  It’s amazing how much release happens after that suggestion!

Written by Sharon Fennimore, a rogue anthropologist, yogini, and global doula based in Pittsburgh, Pennsylvania.


Keeping Cool with Yoga

Top Three Ways to Cool Down with Yoga and Meditation

yogasnowYou might not think of yoga when you consider ways to cool down.  As a matter of fact, with the proliferation of hot yoga, you may only think of yoga as an activity that is meant to generate heat.  But, yoga and meditation offer a variety of ways to help balance your experience of heat.

First, we should explore the concept of “heat” in the context of yoga.  There are many different ways to look at heat and fire in energetic principles, asana/movement, and pranayama/breath.  One approach to heat is to examine the “agni” or digestive fires located in the navel center.  The heat produced during the effort of practicing yoga poses (asana) is designed to clear “energetic” impurities.  An example of an “energetic” impurity might be an emotional block or a mental pattern that is no longer helpful.  This allows energy to move more freely through the subtle body and creates potential where there may have not been any before the block was removed.  The energy of heat and fire is that of purification and “fire is the underlying elemental energy of creativity and accomplishment (Tenzin Wangyal Rinpoche, 44).”  When we are experiencing external heat, it give us an opportunity to connect with this internal element of fire and the power it has to remove obstacles to creative forces.

Sure, clearing impurities sounds good, but I’m going to give you three ways to use specific techniques in yoga and meditation to actually cool yourself down when you are feeling over-heated.  From summer heat to hot flashes to trying to cool your head and heart after an argument, these techniques are tried and true cool down favorites:

sheetali (1)#1: Sheetali Pranayama

The word “sheetali” means cooling in Sanskrit, it is taken from the original word “Sheetal” which is soothing or cold.  This breathing exercise (SOURCE):

  • calms the mind and reduces the fight-flight response
  • cools body and mind and lowers blood pressure (so if yours is low to begin with, be careful)
  • effective in reducing hyperacidity and ulcers
  • in the Hatha Yoga Pradipika, Swami Swatmaram says that a person becomes young and attractive by practicing this exercise (cool down AND get young and attractive—BONUS!)
  • gives control over hunger and thirst
  • if you are stressed, just 5 minutes of Sheetali breath will calm you

In this pranayama the tongue is rolled in a specific manner as shown in figure. But many people can not roll their tongue in this fashion. For these people alternate Sitkari Pranayama gives very similar effects.  In Sitkari Pranayama, you draw air in through your teeth and exhale through your nose. Sitkari means “hissing breath” and is named after the sound made when you draw air through your teeth.  Teeth hissing or Sitkari refers to the sound that is made when air is drawn in through the front teeth either slightly opened or tightly closed, with the tip of the tongue regulating the pressure of air and sound. This technique refers only to breathing in, while exhalations take place normally through both the nostrils.

How to do it*:

  • Beginners can start with deep breathing practice in sitting position
  • Then start inhaling through mouth by rolling the tongue, make sure that the air passing in is cooled via tongue.  If you can’t roll your tongue, then follow the instructions given above for Sitkari or “hissing breath”.
  • Initially 4 seconds inhale through mouth while rolling the tongue and exhale for 6 seconds through both nostrils, this can be practiced for about 5 minutes.

*Note: it’s really best to learn pranayama from a teacher and then practice on your own.  If you ever feel uncomfortable, then stop and return to your normal breathing pattern.  It is very important that you try not to strain while practicing pranayama—it should feel calm and never like you are holding your breath or not getting enough breath.  This exercise can lower blood pressure, so if you already have low blood pressure, please be careful.  If you have any questions at all about whether or not this is safe for you, please check with your doctor or yoga instructor.  These instructions are provided for informational use only.

ViparitaKarani_248#
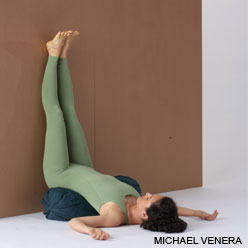
2: Legs Up The Wall Pose (Viparita Karani)


The instructions for this pose are given so clearly online by Yoga Journal, that I’d like to direct anyone who needs full and complete instructions, contraindications and information about this pose to Yoga Journal.  

Please note that if you have very tight hamstrings, acid reflux problems or if being upside down this intensely just doesn’t feel right to you, then you can modify this pose by lying down and putting your legs up on a couch or chair.  Please remember that discomfort causes stress.  If you experience discomfort in this pose or in attempting to do this exercise, immediately stop.  The best thing is to consult with a yoga teacher in your area and learn how to do this pose in a way that is right for you.  A small investment in a private session will give you a practice you can use for stress relief for your whole life.

Step by Step

The pose described here is a passive, supported variation of the Shoulderstand-like Viparita Karani. For your support you’ll need one or two thickly folded blankets or a firm round bolster. You’ll also need to rest your legs vertically (or nearly so) on a wall or other upright support.

Before performing the pose, determine two things about your support: its height and its distance from the wall. If you’re stiffer, the support should be lower and placed farther from the wall; if you’re more flexible, use a higher support that is closer to the wall. Your distance from the wall also depends on your height: if you’re shorter move closer to the wall, if taller move farther from the wall. Experiment with the position of your support until you find the placement that works for you.

Start with your support about 5 to 6 inches away from the wall. Sit sideways on right end of the support, with your right side against the wall (left-handers can substitute “left” for “right” in these instructions). Exhale and, with one smooth movement, swing your legs up onto the wall and your shoulders and head lightly down onto the floor. The first few times you do this, you may ignominiously slide off the support and plop down with your buttocks on the floor. Don’t get discouraged. Try lowering the support and/or moving it slightly further off the wall until you gain some facility with this movement, then move back closer to the wall.

Your sitting bones don’t need to be right against the wall, but they should be “dripping” down into the space between the support and the wall. Check that the front of your torso gently arches from the pubis to the top of the shoulders. If the front of your torso seems flat, then you’ve probably slipped a bit off the support. Bend your knees, press your feet into the wall and lift your pelvis off the support a few inches, tuck the support a little higher up under your pelvis, then lower your pelvis onto the support again.

Lift and release the base of your skull away from the back of your neck and soften your throat. Don’t push your chin against your sternum; instead let your sternum lift toward the chin. Take a small roll (made from a towel for example) under your neck if the cervical spine feels flat. Open your shoulder blades away from the spine and release your hands and arms out to your sides, palms up.

Keep your legs relatively firm, just enough to hold them vertically in place. Release the heads of the thigh bones and the weight of your belly deeply into your torso, toward the back of the pelvis. Soften your eyes and turn them down to look into your heart.

Stay in this pose anywhere from 5 to 15 minutes. Be sure not to twist off the support when coming out. Instead, slide off the support onto the floor before turning to the side. You can also bend your knees and push your feet against the wall to lift your pelvis off the support. Then slide the support to one side, lower your pelvis to the floor, and turn to the side. Stay on your side for a few breaths, and come up to sitting with an exhalation.

 #3: Pitta Balancing Asana and Diet

Pitta is one of the three main dosha’s (constitutions) in Ayurvedic medicine.  If you are curious about your own constitution, you can take this Chopra Center Quiz!   The Pitta dosha controls digestion, metabolism, and energy production. The primary function of Pitta is transformation.  Qualities of Pitta dosha are: hot, light, intense, penetrating, pungent, sharp, acidic. Those with a predominance of the Pitta principle have a fiery nature that manifests in both body and mind.

Dietary Recommendations (SOURCE):

  • Dairy can be helpful in balancing the heat of Pitta, take milk, butter and ghee. Sour, fermented products such as yogurt, sour cream and cheese should be used sparingly as sour tastes aggravate Pitta. Ghee (clarified butter) is recommended. Find our ghee recipe here.
  • All sweeteners may be taken in moderation except molasses and honey.
  • Olive, sunflower, and coconut oils are the best oils to pacify Pitta. Use less sesame, almond, and corn oil, which are more heating.
  • Wheat, rice, barley, and oats are the best grains to reduce Pitta. Eat less corn, rye, millet, and brown rice.
  • The sweeter fruits such as grapes, melons, cherries, coconuts, avocados, mangoes, pomegranates, fully ripe pineapples, oranges, and plums are recommended. Reduce sour fruits such as grapefruits, apricots, and berries.
  • The vegetables to favor are asparagus, cucumbers, potatoes, sweet potatoes, green leafy vegetables, pumpkins, broccoli, cauliflower, celery okra, lettuce, green beans, and zucchini. Reduce tomatoes, hot peppers, carrots, beets, eggplant, onions, garlic, radishes, and spinach.
  • Pitta types need to use seasonings that are soothing and cooling. These include coriander, cilantro, cardamom, saffron, and fennel. Hotter spices such as ginger, cumin, black pepper, fenugreek, clove, salt, and mustard seed should be used sparingly. Very hot seasonings such as chili peppers, and cayenne are best avoided. Chew on fennel seeds after meals to cool down acid in the stomach.
  • For non-vegetarians, chicken, pheasant and turkey are preferable; beef, seafood, and eggs increase Pitta and should be minimized.

Asana Recommendations (SOURCE):

Asanas that help balance Pitta are those that place pressure on the naval and solar plexus region, in the small intestine where Pitta resides. There should be enough calming poses included to sedate irritation, anger, and intensity caused by Pitta. In general all forward bends, side stretches, twists, backbends that stretch muscles in your stomach will be beneficial.

Here are some suggestions:

– Ustrasana (Camel Pose) – This asana opens up abdomen, solar plexus, and chest, allowing for free movement of energy through these regions.

– Bhujangasana (Cobra Pose) and Dhanurasana (Bow Pose) – Also excellent solar plexus extensions for Pitta. They activate and support healthy thyroid gland function that is responsible for internal temperature regulation and metabolism. A better functioning internal thermostat will make hot weather more bearable.


- Matsyasana (Fish Pose) – as Yoga Journal notes, Matsyasana is the “destroyer of all diseases.” It stretches and stimulates the muscles of the belly and front of the neck; and stimulates the organs of the belly and throat

 Utthita Parsvakonasana (Extended Side Angle) and Trikonasana (Extended Triangle) – are good example of side stretches. Side stretches stimulate the abdominal organs; help relieve stress; improves digestion; and can be used to alleviate anxiety.


- Paschimottanasana (Seated Forward Bend) and Pada hastasana (Hands to Feet) – all forward bends calm the brain and helps relieve stress and mild depression; stimulate the liver, kidneys; improves digestion; soothe headache and anxiety and reduce fatigue
.

–  Meru Vakrasana (Simple Spinal Twist) andArdha Matsyendrasana (Semi Spinal Seated Twist) – all twists stimulate the liver and kidneys, energize the spine, stimulate digestive fire in the belly; and relieve fatigue.


- Supta Vajrasana (Sleeping Thunderbolt or Diamond Pose), Sarvangasana (Shoulder Stand), Halasana (Plow), and Mayurasana (Peacock) – are good Pitta balancing poses, as well.


Love this article?  Looking for more ways to improve the quality of your life through meditation, yoga and mindful movement?  Make sure you sign up for my weekly newsletter so you are the first to receive updates and information.


Posted by Sharon Fennimore, MA, E-RYT, RPYT and DONA Trained Doula:  a yoga and meditation instructor and mind body coach based in Pittsburgh, Pennsylvania.  I offer phone coaching and support and online courses in meditation and professional development.  My e-book, Matrika Prenatal Yoga is available on iBooks, Kindle and a PDF download.   Check out my website for more information!  

Are you doing yoga “right”?

This is a re-post of one of the most read blog posts I have written in the past 5-years.  This originally appeared in the blog in February 2009.  It’s a great reminder as we start the new year for a healthy and safe way to approach your practice.

Both new yoga students and more experienced yoga students, at some point in a class or practice, may wonder if they are doing a particular pose correctly.  Many students wish that instructors would just come over and correct their pose or hope that, in time, they’ll start to get it right.  Most new students are sure they can’t possibly be doing yoga right and many experienced students have developed poor alignment habits that feel right, but are blocking them from deepening their asana practice.

This is why we all, regardless of experience level, need to continue to take classes, workshops and find instructors that provide encouragement and assistance in deepening our practice at all levels.  Even the Masters have a guru.

A well-trained instructor has studied principles of alignment and guides from their tradition in methods for breathing, moving during and between poses and various modifications for asanas.  It is their job to verbally instruct students and make physical adjustments that keep students moving towards these ideal alignments and to encourage students to deepen their pose while maintaining safety.

All this being said, I maintain that there is never a “right” way to do a pose.  If you are a perfectionist with a deep commitment to making sure that you do everything right, then this idea might drive you crazy.  The key to your asana practice is coming to terms with the idea that it isn’t how a pose looks that matters, it’s how it FEELS.  In a culture and society that makes appearance a significant priority, this might be an uncomfortable truth.  This is why we practice—–first, we shake our commitments up and then we work honestly with our physical reality.  Having the support and guidance of a fabulous instructor and a community of other students cheering us on is very important.

Yoga Matrika provides a lot of props that you can use to help poses feel better–cork wedges, bolsters, blankets, straps, cork blocks and meditation cushions.  We use these props to extend our reach and grasp and open the body in gentle and supported ways.  If you don’t know how to use a prop, just ask your instructor or watch experienced students to see where they place their block, blanket or bolster to support their pose.  Using props isn’t cheating!  When you use a prop it means that you deeply understand the alignment principles of a pose, feel that your body needs additional space to apply those alignment principles and that you are in touch with how you feel in your body.

Many of us carry stress in a habitual way in our bodies and have created patterns of movement that are adaptations to this stress.  For example, many people lead with their chins—-sticking their chin out and causing stress in the upper back and neck.  Many of us feel a rise in our shoulders with stress and have daily life-tasks that cause us to round in the upper back and shoulders.  Most of us sit in chairs all day long or spend time waiting for buses with a heavy backpack dangling from one shoulder or the other.  These adaptations manifest themselves in our yoga poses too!  The challenge is to identify these places where we hold stress and allow the alignment principles of asana (poses) to help us open and release.  When this happens during practice, many students have an “ahhhhhhhhh” moment and most students feel more grounded, balanced and even after a class.

Here is a guide to getting it “right”:

1) Each and every time you practice, you have a different body to work with.  Accept that “improvment” and “mastery” are not linear in yoga.  On Monday, you might be able to touch your toes.  On Thursday, you may feel tight and not be able to even look at your toes.  Being in touch with these feelings and changes is an important part of yoga.  It’s not about deepening the pose over time, it’s about working with the pose at THIS time.

2) If something hurts, then you really are doing it “wrong.”  Yoga requires effort and skill, but there should NEVER be pain involved. No pain during your practice and no pain after your practice.   If you are the type of person who tends to “over do it,”  then my recommendation is that you try to do every pose in a practice to 75% of your ability.  See how you feel the next day.

3) Let your breath be your guide.  During your practice, check in with your breathing pattern.  If you feel out of breath or are holding your breath, this is a sign that you are pushing yourself through your asana practice.  Slow down, exhale deeply and allow a fresh inhalation to guide your pace.

4) Ask yourself often: “Does this feel delicious?”  If the answer is yes, then you are doing it RIGHT.  If the answer is no, then move around a little to shift your pose or focus or breathing pattern and see if you can move into a sweet spot.  There are no rules and asana are not static.  Sometimes even a slight shift in weight or a bend in a knee or releasing your jaw can make a big difference.

5) Accept the learning curve!  There is a learning curve.  When you start anything new, it takes time to get a feel for it.  This applies equally to basket weaving, piano lessons, swimming and yoga—–anything new feels new, unfamiliar, and strange.  Sometimes this feeling can last a while.  Sometimes it comes back after a long time gone.  As you continue to make a commitment to your practice and roll out your mat more often, the flow and patterns and names of asanas and instruction cues will start to become more and more familiar.  You will gain confidence.  You will feel FABULOUS after your class.

When you take a group class, it is your responsibility to modify your practice in a way that works for you.  During class, if you need to slow things down while everyone is speeding up, then you should always feel free to come into child’s pose to lie down or sit down and breathe.  At Yoga Matrika, you will notice that many students are modifying their practice and not everyone is doing the same thing at the same pace at the same time.  A group class isn’t a coordinated event like underwater ballet.  Instructors provide suggestions, guidance, information—but YOUR body and YOUR breath determine what happens on your mat.


Week 2: Day 1: The End

During my “day of rest” in the 8-week series designed by Rodney Yee yesterday I not only took the opportunity to do a home practice that I really wanted to do, I also looked over my blog entries from the first week of the series.  What was painfully obvious is that I don’t want to be doing this practice.

A home practice is not about self-punishment, it should feel really good.  It should be about commitment, dedication and making choices that reflect a very personal and intimate evaluation about state of mind, breath and body.  I really enjoy my home practice, but doing the series as designed by Rodney Yee felt a little bit like punishment—–I was really forcing myself, albeit unsucessfully, to do his program even when I didn’t feel like it.

This is precisely what makes a home practice different from a group practice.  If I go to a group class and the instructor has us do six tree poses, then I am going to do those six tree poses to the best of my ability and depending on how I feel, the energy of the instructor and the energy of the group on the class, I’m either going to feel like I enjoyed the class or not or that I learned something new or not, but you can’t choose your own adventure when you go to a group class.  When I practice at home, I always start out with some warm-up poses and seated grounding poses and then I organically move in a way that supports exactly where I am.  Tight in the hips, I throw in pigeon pose.  Tense through my spine?  I’ll start with some twists.  Basically, I start with a few poses that allow me to self-diagnose and then I do what feels best after that.  It just doesn’t feel right to be by myself, all alone, doing what doesn’t feel right.

This is not, in any way, a judgement on the book or the series or sequences as designed by Rodney Yee.  As a matter of fact, I think that, for someone who is relatively new to yoga and who wants to explore what it means to have a home practice, this is still a truly valuable reference.  But, for someone who has been doing yoga for almost 20-years and already has an established home practice, this series feels like I am being asked to deny the wisdom of my practice, a practice that has served me well for quite some time now.

So, my 8-weeks of yoga with Rodney Yee ended after a week.  In the end, I have learned many valuable things from this experience of just one week:

  • Moving Toward Balance: 8 Weeks of Yoga with Rodney Yee is an excellent reference book for yogis of all levels (including teachers) who want to learn how to sequence a yoga practice, to explore alignment and desire very clear written instructions that are complemented by instructive photographs.  Regardless of whether you do the sequences as described, there is a lot of valuable information in this reference.
  • A home practice should never feel forced or like a punishment.  While you shouldn’t shy away from poses or only do the same exact poses, yoga isn’t poses and pose practice isn’t yoga.  If you take group classes regularly and want to try to do yoga at home, make sure that your home practice is something you look forward to.  Even if you just roll out the mat and enjoy an extended savasana, that is just as valid of a home practice as anything else.  Love it, enjoy it, benefit from it—–may your home practice be peace.
  • My current advice to students who want to start a home practice is actually the most helpful thing I can offer (I’m patting myself on the back here……).  I suggest that you roll out your mat.  Sit on your mat and breathe and see what happens.  If you feel inspired to practice a particular asana or move in a particular way, then do that.  If not, then do 5-10 cat/cow movements and see if you feel inspired.  If no inspiration comes to you, move into child’s pose and do a few sun salutations.  As you move through sun salutations, see what you feel inspired to—-perhaps a warrior pose or two, or maybe an eagle pose or maybe a tree pose or half-moon pose or…..you get the idea.  Not inspired, come on down and do a bridge pose and then wind relieving posture and hug your knees into your chest.  End with a 10-minute savasana.  Whatever you do, end in a 10-minute savasana.  I repeated that twice on purpose.  Even if you just sit, breathe and then end with savasana, that’s a lovely practice.  It might just be all you needed to start your day in peace or energize yourself in the middle of the day or close the day for a great night’s sleep.  Whatever it is, it’s yours and yours alone.

I’ll keep writing my blog and practicing and hope you’ll keep reading.   And, we’ll all sleep better tonight knowing that I’m no longer forcing myself to practice in a way that doesn’t bring peace to my life.  Oh home practice, I missed you last week!  Welcome back!  Welcome home!

Holiday Yoga: A Prenatal Practice

Yoga Matrika is going to be offering a limited number of prenatal yoga classes during the holidays.  In case you don’t live in Pittsburgh and have found this practice online, Yoga Matrika offers prenatal yoga classes in Pittsburgh, Pennsylvania.  The good news about this practice is that you can do it anywhere!

We all know that even a few stretches and relaxation exercises can make a huge difference in how we feel during pregnancy.  During the holidays, our diets and schedules change and this makes it even more important that we maintain our practice.  Here is a very short practice that is appropriate for pregnant women that you can do at home, if you are traveling or wherever you roam.  For all you Pittsburgh-based Matrika Mammas, I look forward to seeing you again in person for class in the new year!

Center & Breathe

First step, find a comfortable seat.  You do not have to be sitting on the floor and if you are at all swollen or feel any aches, it may be best for you to sit in a chair.  If you are seated in a chair, you want to just sit on the front edge of the chair (not leaning back and resting on the seat back) and make sure that your feet are firmly placed on the ground.  If this is uncomfortable due to the height of the chair, you can place support under your feet (yoga blocks, phone books, etc.).  Just make sure that you have balanced support under each side of the body.  From here, take one palm and rest it over your heart center and another hand over your belly.  Very gently start to take deep breaths.  Feel the front of your body rise with the in-breath and as you exhale, release the full breath and any tension you might be holding in your body.  You can do this for as long as you like, but even taking 5-10 deep breaths will help you feel much more centered and relaxed.

Relax Back and Hips

Come down onto your hands and knees and practice cat/cow.  Keep your neck relaxed and focus on the gentle forward and back sway of the pelvis.  You can do as few of these or as many of these as you like.  If you feel tight through the hips or have low back tension, you may also want to take your hips in circles.  It can be helpful to imagine that you have a paintbrush dangling from your navel and that you are making perfect circles on the floor beneath you.  Move as slowly or as quickly as feels right to you.

Energize the Body and Release Tension

Practice Warrior II pose on the right and left sides of the body.  Focus on opening your heart, relaxing the shoulders and keep your bent knee (the front knee) coming out directly over the ankle.  Use your inner thigh strength to deepen the stretch and keep your knee in a healthy position.  The back leg is straight and you are opening through the pelvis.  Gently tuck your sitting bones under you to lengthen the low back and release low back strain.  Breathe!

Relax the hips & Stretch the Back

Come into Cobbler’s Pose.  With the soles of your feet together, take deep breaths into the body.  If you are rounded through the low back, place a folded blanket, towel or pillow under your sitting bones.  You can sit here and breathe for as long as you like.  If you would like to stretch the back body, then allow yourself to round forward as far as you feel comfortable.  Keep your shoulders relaxed and breathe.

Deep Relaxation

It is very important to actively relax the body for a few minutes each and every day.  This is different from napping or sleeping.  Find a comfortable position for your body lying on the floor—-if it feels good, then it is safe.  Bring your awareness to your feet and actively and systematically relax your body from your toes to the crown of your head.  You may want to purchase a deep relaxation tape or download a Yoga Nidra from iTunes.  It can be helpful to choose some beautiful music or chanting that you enjoy and play that while you relax.

Enjoy the holidays and new year Matrika Mammas!  Check out our new Pregnancy and Postnatal website.  Please do not practice yoga if any of these exercises make you uncomfortable, cause pain or if your care provider has put you on bed rest or encouraged you to limit physical activity.  You should never feel pain in your yoga practice, pregnant or not, and these are not exercises you should “push through” or force yourself to do.  All of these suggested exercises should feel good and relieve tension and strain in your body.

This practice was designed with love by Sharon Fennimore Rudyk, the owner of Yoga Matrika and director of all Matrika Prenatal programs.  Currently, our classes, workshops and Childbirth Education programs are mostly held in Squirrel Hill, Pittsburgh, Pennsylvania.  Please feel free to contact Sharon directly with any questions (412) 855-5692.

Yoga and Hope

In the March 2010 issue of ODE Magazine, there is a thought provoking article, Great Expectations: How hope therapy can help banish mild mood disorders and boost happiness, by Catherine Ryan.  Among the many things that I started to think about was the way that yoga promotes hope.

What precisely is hope?  Hope is a subtle sensation and state of being, sometimes an emotion, that provides a vague sense that something other than what “is” can be possible.  It provides the foundation for every change, every decision and every transition that we find ourselves on the other side of.  Without hope, the capacity to love, to move, to grow or to change is stifled and the great shadow of fear and doubt can overwhelm us.  Hope is sometimes confused as faith, but although these both require one another, they are quite different.  In order to act on hope, one must have faith in the potentially positive outcome of one’s actions.  In order to have faith, there must be a song of hope in one’s heart or the faith grows hard like the stone of dogma.

The kind of hope that provides a boost to happiness is based on the idea that change happens.  Those of us who practice yoga regularly are able to experience this on our mats in every practice.  As we move through asana (poses) or pranayama (breathing), it is impossible not to notice that each breath is different, each moment of holding an asana or transition between the asana creates different sensation.  Some of these sensations and changes in the breath are not welcome!  But, we become uniquely aware through a practice that nothing is the same.  If you have not practiced yoga before, this may sound terrifying.  But, if you practice regularly, you are nodding your head and perhaps even smiling as you acknowledge the profound sense of liberation that this type of awareness creates.  None of us are stuck.  Not only do we have the capacity to change, but change is our natural state of being.

According to the psychologists who provided the data for the ODE article, “Hope, as defined by psychologists, is the belief that you have the skills and energy to make your dreams a reality (Ryan 2010: 53).”  They suggest that our current emotional state is often determined by our expectations for the future (Ryan 2010: 53).  In general, the idea is that hopeful people are happier (53).  If this is the case, then one of the best ways that we can cultivate happiness is to cultivate hope.  Research also seems to indicate that building high expectations doesn’t set you up for a harder fall (Ryan 2010:54).  In fact, high-hopers seem uniquely prepared to bounce back after a fall due to their ability to quickly evaluate a situation and make changes (54).  Yoga can play a role here too.  What we learn in our practice on the mat is that when we feel something “not quite right” we take a moment to breathe into it.  If things don’t change, then sometimes all we need is a soft blanket under our hip, or a block under our hand and, voila!, it feels just right.  What we realize is that it isn’t that we aren’t doing a pose “right” or “wrong,”  but rather that a simple modification can create an “ah ha!” moment out of an “uh-oh.”

Yoga also helps us learn how to set specific and achievable goals.  Apparently, for adults who do not have high-hopes, one of the first steps of hope therapy is to learn how to set a specific and achievable goal (Ryan 2010: 54).  In open level yoga classes, some students can do some amazing things with balance, with their strength, with their energy and some students struggle to just sit on their mat or lie still in savasana—yet they are all doing yoga.  When we first start out, we realize immediately that, while yoga shouldn’t be goal oriented, we can determine the types of goals that are and are not achievable.  It would not be realistic to think that we could come into an advanced balancing pose if we struggle to maintain balance in Warrior I, but it is not unrealistic to think that we can become more aware of our balance and the position of our feet in relationship to the earth.  We also find that great happiness and the complete benefit of the practice is available to us no matter what the poses look like.  After class, the person who could do a handstand in the middle of the room—feels great.  The person who did child’s pose for most of the class—feels great.  A regular yoga practice shows us that there is great benefit in simply being present.  If that isn’t hope, then I don’t know what is.

REFERENCES

Ryan, Catherine
Great Expectations: How hope therapy can help banish mild mood disorders and boost happiness.  IN Ode Magazine, March 2010, pages 53-54.

Written and posted by Sharon Rudyk, Owner and Director of Yoga Matrika located in Pittsburgh, Pennsylvania.

Yoga at Home for $2 a Month

There are a LOT of great reasons to practice yoga at home on your own:

1-You have work and/or family responsibilities that make it impossible to consistently get to a yoga class.  This may be especially true for new parents who are juggling jobs, childcare and EVERYTHING!

2-You travel often and wish you had a practice you could take with you on the road

3-It’s a great way to advance your practice and always do the poses and exercises that best support you in how you feel (if you’re calling the shots, then you don’t have to do any handstands if you don’t want to!).

4-If you are not feeling well, are injured or need a modified practice for any reason, you can learn how to do a practice that will help you feel better

5-You want to make yoga a part of everyday—a real part of your life and not just a class or workshop that you take every once in a while.

Many of my students ask me how to start a home practice and how to be consistent about practicing at home.  For them, and for you, I have designed a great home practice that can be done anywhere by anyone.  In just 10-minutes a day, you will feel a huge improvement in how you feel.  I am charging $24 for 12-months of home practice support.  Here are the details:

Yoga Matrika invites YOU to Make 2010 the Year
YOU Develop a Home Yoga Practice. 

We welcome everyone to become a part of this yoga-based resolution revolution!  You don’t have to live in Pittsburgh and we hope that EVERYONE will take advantage of this project that invites you to make yoga and meditation a part of EVERY day of your life in a gentle and flexible way.   This program is for yogis of all ages, experience levels and physical abilities. 

Here is how it works:

STEP 1:  Pay the fees for home practice or make a donation 

The cost for the basic home practice and one year of home yoga practice support is $24.  You can make a payment online at the bottom of this page.


STEP 2:  You will receive a BASIC HOME PRACTICE in the mail to the mailing address you provide when you make payment. 

This home practice will take most adults 10-15 minutes to complete.  Modifications for practice in a chair or lying down can be provided upon request. The home practice guide will include pictures and text that describe the poses and exercises.  If you ever have any questions, there will be support contact information provided in your WELCOME KIT.


STEP 3:  Every month, you will receive an e-mail newsletter that will provide an additional 5-10 minutes of practice ideas so that you can slowly expand the amount of time you are spending on your home practice through the 12-months of the program.


By the end of one year, you will have:

1-A basic home practice that you can do anytime and anywhere in 10-15 minutes.

2-Three different 1-hour long home practices that you can do:
    #1:  Home Practice for Low Back and Hips
    #2:  Home Practice for Stress Relief
    #3:  Home Practice to Relieve Tension in the Head, Neck and Shoulders

3-Home Yoga & Meditation practices for anywhere between 10-minutes and 1-hour so you will always have a plan for your home practice no matter how much or how little time you have. 


WHAT HAPPENS AFTER I SIGN-UP?

When you sign-up for home practice support, you will receive a Welcome Kit that will include the BASIC HOME PRACTICE.  The basic home practice is designed to take 10-15 minutes and includes some breathing practices, stretching and relaxation.  We suggest that you start by making a commitment to doing 10-minutes of yoga a day for 5-days per week.  It’s more important that you are consistent about practicing every day than the amount of time you spend every day. You will be amazed at how different you feel with just 10-minutes of practice! 

One month after you sign-up for the home practice support, you will begin to receive monthly e-mail newsletters that provide an additional 5-minutes to add on to your basic practice until you have an hour-long home practice with variations for low back and hip care, stress, and tension in head, neck and shoulders.  You will also receive yoga and meditation tips in every newsletter that will help inspire your practice and keep it fresh.  It is ALWAYS your choice how much or how little of the practice you do.  This practice is designed so that, no matter how much or how little time you have, you can always have a great plan for a 10-minute, 20-minute, 40-minute or hour long practice and everything in between.

You don’t need any special equipment or clothing to practice yoga at home.  It is suggested that you decide on a place for your practice and consistently use that place (it can be ANYWHERE that you have floor space—kitchen, hallway, ANYWHERE).  Many people find that it is helpful to have a yoga mat and to keep it within view so that you can just throw your mat down and practice when you have a few minutes. 

We also recommend that you take a minimum of 2-yoga classes a month with a qualified teacher at a studio in your area.  It’s a good idea to go to a class so that you can receive adjustments to your poses, be a part of a supportive yoga community and receive the benefits of an inspiring practice. You will learn new poses and new ideas and you can always incorporate what you like the most into your home practice.   Practicing on your own and practicing with a group is a very different experience.  It’s important to have both of these types of experiences in order to advance your practice AND to keep your home practice fresh and exciting.

Your 2010 home practice will also include reading the following two books:

1.  Reinventing the Body, Resurrecting the Soul
     by Deepak Chopra.  2009

2.  The Joy of Living: Unlocking the Secret and Science of 
    Happiness
by Youngey Mingyur Rinpoche.  2007

Each monthly e-newsletter will include information from these texts to inspire your practice and to keep your practice engaged with yoga philosophy.

You don’t have to buy these books, but we think you’ll want to so you can read them again and again and again!—You can borrow them from the library, create a home practice group with friends and collectively own one set of the texts, etc.  If you do buy them and you have a local book shop, please order it through them or ask them to carry these titles.  If not, then the book titles are linked to information that will help you purchase them online.  If you live in or around the Pittsburgh Metro area, we recommend Joseph Beth Booksellers on the South Side.  They should have these books in stock for you or they can order them!

If you are interested, please go to  https://www.yogamatrika.com//practiceyoga-at-home/
for more details and to sign-up for home practice support.

Posted by Sharon Fennimore Rudyk
Owner and Director, Yoga Matrika

http://www.sharonrudykyoga.info
https://www.yogamatrika.com/
http://www.prenatalyogapittsburgh.com

Make a Poem of your Flesh

“This is what you should do: love the earth and the sun and the animals, despise riches, give alms to everyone that asks, stand up for the stupid and crazy, devote your income and labor to others, hate tyrants, argue not concerning God, have patience and indulgence toward the people, take off your hat to nothing known or unknown or to any man or number of men…re-examine all you have been told at school or church or in any book, dismiss what insults your own soul, and your very flesh shall be a great poem.”

WALT WHITMAN

Whitman suggests here what every yogi knows–the choices we make with our mind are reflected in our bodies.  This is  beauty.  You know when you are in the room with beauty. Thinking back on all the beauties you have been around you know that it isn’t the type of beauty that Cover Girl is selling that sticks with you.  The beauty that you see in others is their poem and the memory of it is a song that vibrates through your own body poem.

As we move through various asana (yoga poses), we have an opportunity to try on different characters and ways of moving and being in the world.  One minute a warrior, then next a dog—only to transform with just one breath into a pigeon and end up a cheeky little monkey.  Through this experiment, we find that we can listen to the poem of our body.  Sometimes, the poem rides the rhythm of the breath. Other times, it is our grunts and the sounds of our effort.  Crow or cow face, there is no yogi in history that does not come up against some darkness.  Sometimes, the poem of our bodies in practice is a ballad uncomfortably narrated by cellular memories we have not before dared to expose.  Sometime, the poem of our bodies is like going out for dessert at midnight.  Delicious.

Here is a simple way to listen to your body and get in touch with the poem of your flesh:

Lie down on your back somewhere comfortable.  Before you lie down, take off your shoes and socks, watch and release your hair from any clips or bands.  Place one hand over your heart and the other hand over your navel.  Feel the rise of your body as you take an in breath.  Feel your navel drop down towards your spine as you exhale.  Do this for as long as you like.  The mind will wander, but you don’t need to follow it.  As soon as you notice that your attention has drifted away from feeling the breath move through the body, you just return to watching your next in breath. 

When you feel ready, bring your awareness to the soles of your feet.  As you inhale, feel the energy of the breath enter through your feet.  Relax the space between your toes, ankles and the bones in your feet.  Feel the connection of your palm to your heart and your palm to your navel center.  There was once a time when you received all of your information about the world and all that sustained you through your navel.  Allow this breath moving through your feet and palms to remind you of your origins, your roots.

Inhale a deep breath as you release your hands and bring your arms up over your head.  STRETCH and reach through your arms and hands as you point your toes.  Hug your knees in to your chest and rock from side to side.

Come up to sit for a moment.  See how you feel.  If your flesh was a poem now, what would it be?

Keep up with the poetry Pittsburgh yogis!

Posted by Sharon Fennimore Rudyk
Director, Yoga Matrika in Pittsburgh, PA
https://www.yogamatrika.com/